Note:
Microsoft .NET Framework 4
or higher is required
The Control4 Picture Manager by HouseLogix allows you to easily add and remove backgrounds and screensaver images to your automation system.
When you initially start the program, you will need to enter the IP address of the primary Control4 controller.
To find the IP address of your primary controller, go to a touch panel or
MyHome app and select "More", then "Settings" and finally "Director". This
will show you the IP address of the system you are connected to.
The program will resolve the hostname and check to see if you have a valid license key. If needed, you will be prompted to enter a key purchased from
www.HouseLogix.com.
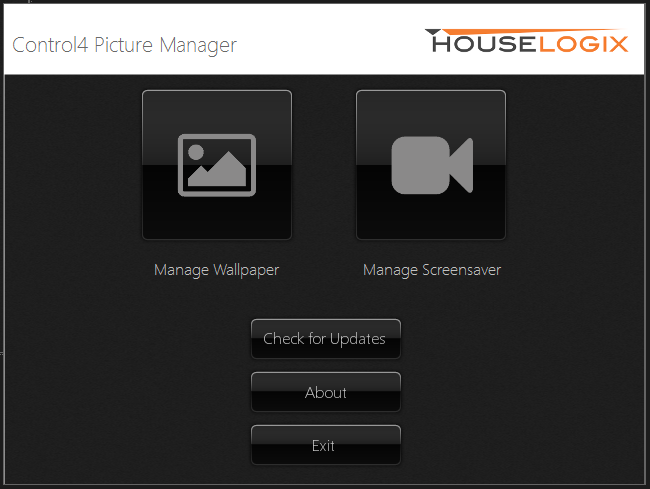
The main launch screen will give you the option to select between the Wallpaper Manager and the Screensaver Manager.
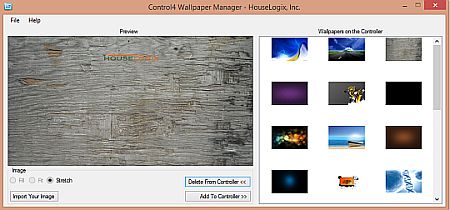
On the left hand side of the main screen you will see a Preview of the image selected. To pick a different picture, click the “Import Your Image” button. Browse your computer for a background, select it, then press “Open”. The picture will now display in the Preview window. Valid image types are JPG, GIF, and PNG.
There are 3 options for the formatting of the picture:
- Stretch: Choose this when you want to fit all of the photo on the screen, regardless of perspective. Objects like people or animals may look distorted as they are stretched or shrunk to meet the touch panel or TVs height and width.
- Fill: This shrinks or enlarges your photo to fit your touch panel or TVs
width. That keeps everything in perspective, but chops off the top and bottom of large images and often stretches smaller images.
- Fit: This option shrinks or enlarges your photo to fit your touch panel or TVs
height. Everything stays in perspective, but it cuts off the sides of large images, and puts borders along the left and right sides of small images.
When using Fill and Fit a slider will appear below the Preview image. Moving
this left and right will shift the image so that you can modify the section of a
picture to be displayed on the Control4 interface.
Selecting the “Add to Controller >>” button will install the image you see
in the Preview window to Control4.
Now, to make the new wallpaper active, go to the Control4 interface and tap the “More” icon, then “Settings”, and finally “Wallpaper”. The new image you installed should be available for selection.
The right side of the main screen shows all the Wallpapers on the Controller. This list is generated from the controller when you initially connect and refreshed when you add or delete a wallpaper. To manually refresh, select “File”, “Refresh Images on Controller”.
To delete a wallpaper from Control4, select the image on the right and click the “Delete From Controller
<<”
After starting the Screensaver Manager, ensure you have selected the proper storage location. To save space on the home controller, screensavers are stored on a network share or USB drive. If you are unsure of your configuration, contact your dealer.
On the left hand side of the main screen you will see a Preview of the image selected. To pick a different picture, click the “Import Your Image” button. Browse your computer for a background, select it, then press “Open”. The picture will now display in the Preview window. Valid image types are JPG.
There are 3 options for the formatting of the picture:
- Stretch: Choose this when you want to fit all of the photo on the screen, regardless of perspective. Objects like people or animals may look distorted as they are stretched or shrunk to meet the touch panel or TVs height and width.
- Fill: This shrinks or enlarges your photo to fit your touch panel or TVs
width. That keeps everything in perspective, but chops off the top and bottom of large images and often stretches smaller images.
- Fit: This option shrinks or enlarges your photo to fit your touch panel or TVs
height. Everything stays in perspective, but it cuts off the sides of large images, and puts borders along the left and right sides of small images.
When using Fill and Fit a slider will appear below the Preview image. Moving
this left and right will shift the image so that you can modify the section of a
picture to be displayed on the Control4 interface.
Selecting the “Add to Storage >>” button will install the image you see
in the Preview window to Control4.
The right side of the main screen shows all the Screensavers currently in storage. This list is generated from the controller when you initially connect and refreshed when you add or delete a screensaver. To manually refresh, select “File”, “Refresh Screensavers”.
To delete a screensaver from Control4, select the image on the right and click the “Delete From Storage
<<”
When you are finished adding and removing screensavers, to make your changes take affect, click "Update Control4".
|